Thursday, June 14, 2012

Pinterest Project #7 - Mmmm Lasagna!

I was pretty lazy today - no work on a mosaic or bleaching a t-shirt. In fact I can honestly say that I didn't even get out of my pjs until near noon! I spent most of the morning responding to emails from a couple different art teachers who had questions on some things they saw on my art ed blog and website (yes - even though it's summer - many of us can't completely shut down the lesson planning). I love sharing ideas with teachers from all around the world. When I started teaching 17 years ago - I had no idea this kind of collaboration would be possible! I couldn't of imagined it. My Art Ed blog - Splats, Scraps, and Glue Blobs and My Art With Mrs. G! Website 

But even though no artsy Pinterest projects were on the agenda for the day - Pinterest did play a role in the day - or at least the evening. Dinner!

Low Carb - Gluten-Free Lasagna 
Here's a picture of the finished product. Though it was lower carb and GF it was not low on taste! Very Yummy!

Visit my Low Carb & Yummy board for the original pin and recipe --> http://pinterest.com/pin/217580225717501567/

Here's what it looked like right out of the oven....mmmmm smell that?

Here's my helping next to a healthy salad - Thanks to Heidi for the lettuce from her garden!


Wednesday, June 13, 2012

Pinterest Project #6 - Gluten-Free Sesame Chicken


Sesame Chicken - Low carb and Gluten-free!

Eating gluten-free can get boring at times. There is a great variety of things you can cook and eat - but it certainly isn't as easy coming up with dinner ideas when you can't tolerate gluten.  So I'm always looking for different ideas.


<--Tonight we tried this recipe I found on Pinterest - Sesame Chicken
I followed the recipe as is and it came out pretty good. It had good flavor and the chicken was very juicy. The crust was a touch floury tasting because the pan I used was a bit too big for the amount of oil and butter - so it didn't crisp up as much as it should have.
 We also had some  broccoflower with it. That was very good - looked like green cauliflower!

It's a thumbs up and will do this one again.

Pinterest Project #5 - T-Shirt + Bleach pen = Cool!


This one is from my Pinterest board titled "T-shirt art ideas"
There are quite a few of ideas there I want to try but this one really intrigued me. It seemed so simple - a shirt and a bleach pen. The idea of being able to draw a design on easily with a fine tipped bleach pen seemed too simple to be true - but it was!


Click on the following link to see the original Pinterest post that I pinned -

So Here's What I did - 
I started with a black t-shirt from Target that I purchased on sale for $5. 
It's 100% cotton - but would probably work just fine as long as it was mostly cotton. 
I also picked up the bleach pen there for about $3.

I wanted the design to be on the side of the front and back of the shirt similar to the blue one above so I turned the shirt on the side so that the seam was in the middle. I slipped a piece of cardboard into the shirt and also added some wax paper so the bleach wouldn't seep through to the other side.


And away I went! - drawing my design with the fine tip side of the bleach pen. I wanted to do a cherry blossom branch like design and was confident in just going for it without a design drawn out first. 
You could take a piece of chalk and draw out the design you want first.


It was fun to watch how fast the color changed as I was drawing. The fumes from the bleach pen started to bother me a bit so I took it outside to sit for about 30 minutes. The longer you leave it on the lighter it will become. Of course that is dependent on what color of shirt you start with. On a lighter shirt you may not need to have it sit as long. Just keep an eye on it until it is the color you want.

I rinsed the shirt in cold water to get the remaining bleach off and stop the bleaching action. 
Then tossed it in the washer on cold with a bit of soap.

The Finished Product! - 


It has the Toby sniff of approval!
I think it came out pretty good and I can't wait to try it again. Next time with a lighter color. I'm also thinking of trying to use a stencil and spray bottle of bleach to mist around a design.


Friday, June 1, 2012

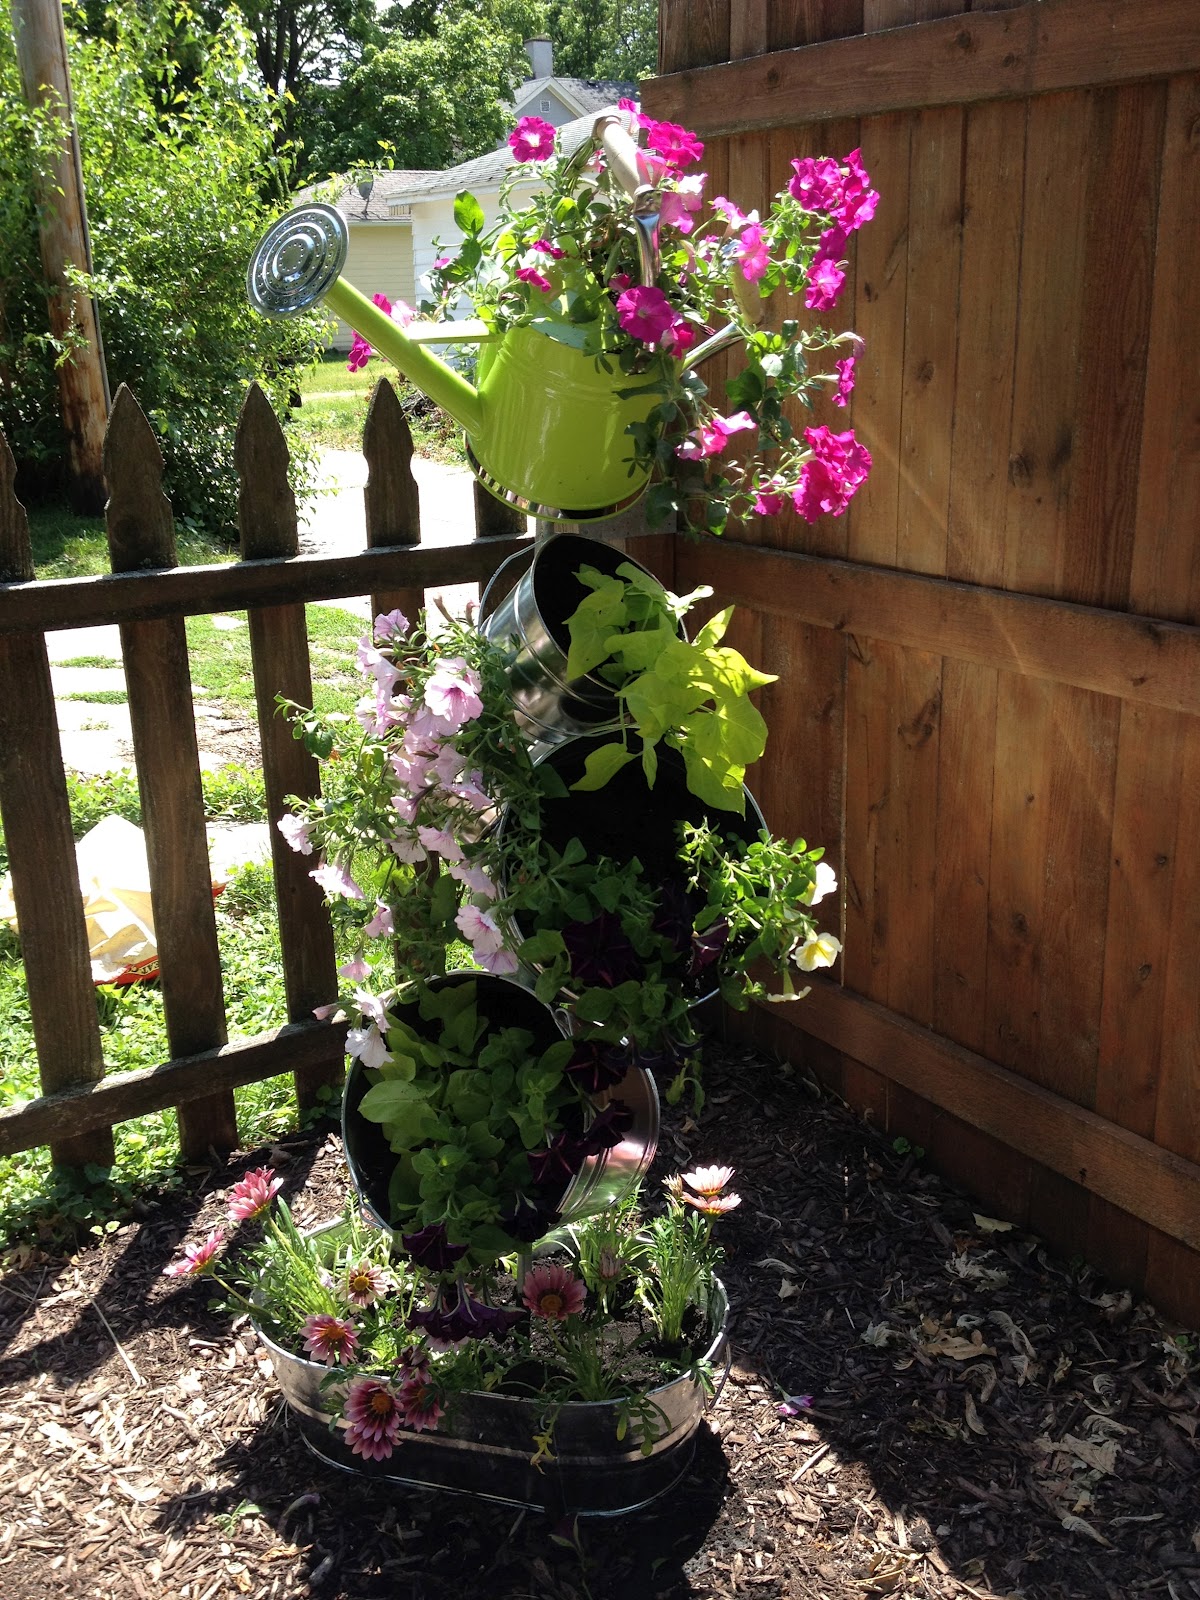
Pinterest Project #4 - A New Addition to the Garden

This project is a nice addition to our back yard garden area. 


Here's the original pin that inspired this project -

Galvanized Tipsy Pots


I spent some time Wednesday morning wandering around different stores to gather some supplies to build this. My best assistant listened patiently as I told him what I wanted to do and how I thought we could go about doing it.


It took us about an hour to put it together.

That's concentration there!
By dinner time Wednesday we had it all put together and in the spot I wanted it. Now to get flowers and fill it up! But that would have to wait a day or so. Thursday was not a day for planting - very cold and super rainy.

This morning I hunted down flowers I wanted and finished planting just in time for Chuck to come home and see the finished product. I love it!
 

Thursday, May 31, 2012

Pinterest Project #3 - Cold, Rainy Day=Baking!

Today is one Yucky Day! It's cold and rainy so I couldn't finish the project I started yesterday. It involves the garden and I'm a fair weather gardener. It has to be warm and sunny for me to work in the yard. I love the sun! Sadly - there is none today...So switch gears from an outside project to an inside one.

My Pinterest boards that include food are growing each day - so I didn't have a hard time finding something to bake. Yet Chuck and I really try our best to eat as healthy as we can. Now we're not crazy healthy- we have a tasty Starbucks way too many times a week and I just had to have some Dairy Queen ice cream to put the oh so yummy caramel sauce on last night (boy was that a great idea...mmmm....more left for tonight). But we do try really hard to make food that is best for us and for my aggravating stomach issues. We cut out a lot of processed food and try to limit fructose. Both of these things I've found tend to bother me somewhat and I just don't feel well after eating a lot of it. We've totally cut out gluten...and unfortunately I seem to be quite sensitive to even a little bit of it - seemingly safe fruit that was probably cross-contaminated on a cutting board or by someone's hands putting in on the platter can even make for a uncomfortable day for me. We seem to find a good balance of healthy sprinkled with enough sweet treats to make life great! Today for instance - I know that tonight I want to have some more of the ice cream with caramel...so I make sure that the rest of the food today will be much better for me and my tummy than that treat. Being at home, inside on a rainy day means the munchies will be calling. So this morning I made up a batch of Kale chips. These crispy, salty leaves are perfect to munch on and not feel guilty about calories or feel upset from a processed snack like potato chips. As of 3pm Sara and I have finished the whole pan of them! Lots of nutrients and little calories.

So as I looked for an interesting recipe on one of my Pinterest boards to make, I knew I would try one of the more healthy ones. I decided to try a chocolate muffin recipe that I pinned a while back. Now I know - Chocolate muffins don't sound very healthy but the ingredients intrigued me so I gave it a try.
Here's the photo from the original pin - and the link --> Chocolate muffins

I followed the recipe as it was written with the exception of the sweetener. Chuck and I do not eat any artificial sweeteners and I really don't like Stevia. We try to stay away from too much fructose so when baking something for us we use glucose so I added about 1 1/4 cups of glucose (also called dextrose) instead of the sweetener the recipe called for. I also didn't use as many chocolate chips as they did. I used just a few of our favorite Ghirardelli dark chocolate chips put on the top a few minutes before they were done.
Mine didn't come out as pretty as the ones pictured above. I didn't fill the papers enough so mine are smaller. But they came out very yummy. Chuck had two already as soon as he came home. He scraped the "chocolate paper" pretty clean so that's a Thumbs Up from him!

I couldn't wait for it to cool down before trying - so this one was ooey gooey good.


Tuesday, May 29, 2012

Pinterest Project #2 - A Sweet Surprise!

Who'd a thunk it? Yummy Caramel from a can of sweetened condensed milk submerged in a water-filled crockpot for 8 hours on low?  This was one of those things I pinned just because it seemed so strange. My niece Megan saw that I and other pinners she followed had pinned this and she just couldn't believe it would work. So this one's for her!
Here's the original pin  - Crockpot Caramel  This pin doesn't link to anything but the photo but the directions are listed under the pin.
Here's what I did -
I got myself a can of sweetened condensed milk - Store brand just fine. I love HyVee - there's a smile in every aisle!
 I put a small plate in the crockpot and put the can on that so that I wouldn't get a rust ring on the bottom of the crockpot. Added enough water to completely submerge the can.

I put the lid on and set it to low. Then set my iPhone to remind me in 8 hours that it was done!
 8 Hours Later - I used some tongs to take it out of the hot water -
 And cooled it down a bit with some cold water
 Then I called Chuck in to do the opening -


YES! Yummy Success! It's a very tasty light caramel sauce. Perfect for some ice cream or apples...or just a spoon!

Haven't tried Pinterest yet? Give it go - but be warned it can be very addicting! My Pinterest Boards

Summer of Pinterest!

Ahhhhh....Summer! I so love you! The rest, the relaxation, the sun...
But anyone who knows me knows I have a hard time sitting around doing nothing (though I've been practicing) - So a "to-do" list is usually how I start my summer break. The list includes the usual cleaning or organizing around the house, working in the yard, and attempting to exercise more. Always on the top of my list is to do something creative. I love, love to try new things - especially creative artsy things. As I was practicing doing nothing the other night -as close to doing nothing I get almost always involves looking around online- finding things to pin on the highly addictive Pinterest when an idea struck me. I could spend my summer trying as many of these fun, sometimes strange, creative things that I enjoy pinning!
And so - My Summer of Pinterest Has Begun!! 
Now - I'm not going to say that I will do something different each and every day this summer - because frankly that would be stressful and summer should never be stressful (that's what the school year is for). But I do plan on doing as many as I can. Some maybe very simple - like a hairstyle or a recipe. Others may be quite involved like a home or garden project. I've technically already finished one before I decided to do this. My first Pinterest project of the summer was wrapping my iPhone earbuds in colorful string to make them more artsy and keep them from tangling. I did these last week - but I will count them as Pinterest Project #1. Scroll down after the photos to see what I've started for project #2!

These came out great looking and I was pleased when I pulled them from my purse they were not a tangled mess! But they took FOREVER! I think I spent about 12 hours on them  here and there when I was watching tv. So if you are going to try this one - be prepared to spend some time on it.
Here's the Pinterest link to this project.--> Wrapped earbuds
The finished result!
This is what it looked like as I started.
Pinterest Project #2 - I started this one this morning and it should be done tonight - Here's a sneak peek... 
This one's for you Megan!;-)